Saturday, November 3, 2012
Tropical Fruit Sundaes
Food & Wine / Daniel Boulud
SERVINGS: 12
2 cups heavy cream
1 cup milk
1/2 cup finely grated peeled fresh ginger (3 ounces)
6 1/2 tablespoons sugar
3 1/2 teaspoons powdered gelatin (from 2 envelopes)
9 ounces mascarpone cheese
1 cup dried unsweetened coconut flakes
1 pineapple—peeled, cored and finely diced (4 cups)
2 large mangoes—peeled, pitted and finely diced (4 cups)
1/2 cup light brown sugar
1 teaspoon finely grated lime zest
1/4 cup lime juice
2 pints raspberries
2 pints vanilla ice cream
ACTIVE: 45 MIN TOTAL TIME: 2 HRS 30 MIN
In a large saucepan, combine the cream and milk with the ginger and bring to a simmer. Remove from the heat, cover and let stand for 30 minutes.
Strain the cream into a bowl, pressing on the ginger. Wipe out the saucepan. Return the cream to the saucepan and bring to a simmer. Remove from the heat and whisk in the sugar and gelatin. Let the cream cool to lukewarm, then whisk in the mascarpone. Spoon the mousse into 12 glasses or bowls and refrigerate until set, 1 hour.
Meanwhile, preheat the oven to 350°. Spread the coconut flakes in a pie plate and toast until golden, 3 minutes. Let cool.
In a bowl, toss the pineapple and mangoes with the brown sugar, lime zest and juice. Spoon the pineapple and mangoes over the ginger mousse and top with the raspberries. Scoop the ice cream into the bowls, garnish with the toasted coconut and serve.
Serve With Shortbread cookies.
Roasted Mushrooms with Shallots and Herbs
Food & Wine
SERVINGS: 4 to 6
2 1/2 tablespoons Asian sesame oil
4 garlic cloves, minced
3 tablespoons minced fresh ginger
1 1/2 tablespoons low-sodium soy sauce
1 1/4 pounds mixed mushrooms—such as white, cremini and shiitake—large caps quartered
Salt
10 small shallots, peeled
1/3 cup chopped mint
1/3 cup chopped parsley
1 tablespoon chopped dill
1 tablespoon roasted black sesame seeds
ACTIVE: 20 MIN TOTAL TIME: 50 MIN
Preheat the oven to 400°. In a small bowl, combine 2 tablespoons of the sesame oil with the garlic, ginger and soy sauce. Spread the mushrooms on a baking sheet and drizzle with the garlic–sesame oil mixture; toss to coat. Season with salt. Roast the mushrooms for about 30 minutes, until tender and glazed.
Meanwhile, on a second large rimmed baking sheet, drizzle the shallots with the remaining 1/2 tablespoon of sesame oil; toss to coat. Season with salt and roast for about 25 minutes, turning once, until golden brown and tender.
Scrape the roasted mushrooms and shallots into a serving bowl. Add the mint, parsley, dill and sesame seeds and toss to coat. Serve hot or warm.
Make Ahead The roasted mushrooms and shallots can be kept at room temperature for up to 4 hours. Reheat in a 400° oven before serving.
My Notes: Tasty and healthy. The fresh herbs are key. The mint is especially nice. I cooked them ahead of time and regretted it somewhat. They'll taste best fresh from the oven.
MXF
Roasted Pear and Chocolate Chunk Scones
Smitten Kitchen
Makes 6 generous scones; you can absolutely make these a bit smaller and reduce their baking time accordingly
3 firmish pears (about 1 pound or 255 grams)
1 1/2 cups (190 grams) all-purpose flour
1/4 cup (50 grams) granulated sugar plus 1 1/2 tablespoons granulated for sprinkling
1 1/2 teaspoons (8 grams) baking powder
1/2 teaspoon (3 grams) table salt plus additional for egg wash
6 tablespoons (85 grams) cold unsalted butter, cut into small cubes
1/4 cup (60 ml) heavy cream
1/4 cup (3 ounces or 85 grams) semisweet or bittersweet chocolate, chopped (or chips)
2 large eggs, 1 for dough, 1 for glaze
Heat oven to 375°F. Peel and core pears. Cut into 1-inch chunks. Line a large baking sheet with parchment paper. Arrange pear chunks on parchment and roast until they feel dry to the touch and look a little browned underneath, about 20 minutes. Slide parchment paper with pear chunks onto a cooling rack (or onto a plate in the fridge or freezer to speed this up) and cool to lukewarm. Leave oven on. Line baking sheet with another piece of parchment.
Whisk flour, baking powder, 1/4 cup sugar and salt together in the bowl of an electric mixer. Toss in cooled pear chunks, bits of butter, heavy cream and 1 egg. With the paddle attachment, mix the dough on low speed until it just comes together. Don’t overmix. Add the chocolate chunks and mix for 5 seconds more.
On a very well floured counter, pat out dough into a 6-inch round. Cut into 6 generous wedges and transfer to baking sheet at least two inches apart (do as I say, not as I did here!). Whisk remaining egg in a small dish with 1 teaspoon of water and a pinch of salt. Brush each scone with egg wash and sprinkle with remaining tablespoon of sugar.
Bake scones until firm and golden, about 30 minutes. Transfer to a cooling rack. Serve, and pat yourself on the back for your excellent host skills.
Do ahead: You can get this recipe all the way to the point where you’d bake them, and instead cover the pan with foil or plastic wrap and freeze them overnight. Bake them directly from the freezer in the morning; they should only take a few minutes longer. For longer than overnight, transfer frozen, already shaped, scones to a freezer bag until needed. In both cases, brush the egg wash/sprinkle the sugar on while still frozen, before baking the scones.
Apple Mosaic Tart with Salted Caramel
Smitten Kitchen
Serves 12
TART:
14-ounce package puff pastry, defrosted in fridge overnight
3 large or 4 medium apples (about 1 1/4 pounds)
2 tablespoons granulated sugar
2 tablespoons unsalted butter, cold, cut into small bits
SALTED CARAMEL GLAZE:
1/4 cup granulated sugar
2 tablespoons unsalted butter (or salted, but then ease up on the sea salt)
1/4 teaspoon flaky sea salt (or half as much table salt)
2 tablespoons heavy cream
Puffed pastry is a wonderful thing to keep around in your freezer. It comes at all price points, but I do think that the best ones contain only butter, not shortening. DuFour is my favorite brand; it is an investment that you will be able to taste in every bite and this is the kind of tart where you’ll really be able to tell. If you buy some for this recipe, buy two. You’ll thank me next week, when you need to make it again.
Note: The caramel glaze is not like a caramel sauce you would put on ice cream. Those will have more cream in them, to keep them thin. I was going for a firmer one, soft only when melted, and with as clean of a color as possible (not muddied by extra cream).
Heat your oven to 400°F. Line a rimmed baking sheet or jelly roll pan with parchment paper. Ideally you would use a 10×15-inch jelly roll pan, as I do here. A smaller pan will make a thicker tart (and you might need fewer apples). In a larger pan, you can still fit a 10×15-inch tart, which I think is the ideal size here.
Lightly flour your counter and lay out your pastry. Flour the top and gently roll it until it fits inside your baking sheet, and transfer it there. Try not to roll it any bigger than you’ll need it, or you’ll have to trim, which means you’ll have to sprinkle the trimmings with cinnamon-sugar and bake them into cookie-sized segments for snacks. And that would be terrible.
Peel the apples and cut them in half top-to-bottom. Remove the cores and stems (I like to use a melon baller and/or a pairing knife). Slice the apples halves crosswise as thinly as you can with a knife, or to about 1/16-inch thickness with a mandoline. Leaving a 1/2-inch border, fan the apples around the tart in slightly overlapping concentric rectangles — each apple should overlap the one before so that only about 3/4-inch of the previous apple will be visible — until you reach the middle. Sprinkle the apples evenly with the first two tablespoons of sugar then dot with the first two tablespoons butter.
Bake for 30 minutes, or until the edges of the tart are brown and the edges of the apples begin to take on some color. If you sliced your apples by hand and they were on the thicker side, you might need a little more baking time to cook them through. The apples should feel soft, but dry to the touch. If you puffed pastry bubbles dramatically in any place during the baking time, simply poke it with a knife or skewer so that it deflates. This is fun, I promise.
Meanwhile, about 20 minutes into the baking time, make your glaze. In a small saucepan over medium-high heat, melt your last 1/4 cup sugar; this will take about 3 minutes. Cook the liquefied sugar to a nice copper color, another minute or two. Off the heat, add the sea salt and butter and stir until the butter melts and is incorporated. Add the heavy cream and return to the stove over medium heat. Cook, stirring constantly, until you have a lovely, bronzed caramel syrup, just another minute, two, tops. Set aside until needed. You may need to briefly rewarm it to thin the caramel before brushing it over the tart.
After the tart has baked, transfer it to a cooling rack, but leave the oven on. Using very short, gentle strokes, and brushing in the direction that the apples fan to mess up their design as little as possible, brush the entire tart, including the exposed pastry, with the salted caramel glaze.
Return the apple tart to the oven for 5 to 10 more minutes, until the caramel glaze bubbles. Let tart cool complete before cutting into 12 squares.
My Notes: This mostly tastes good. I love the caramel glaze and I like the apples. I do not love the puff pastry. Perhaps I rolled it out too thinly. In fact, the next time I make this, I don't think I'll roll it out at all. Also, I used a mandoline so the apple slices were very thin. In that case, I would double over them for more apple taste in each bite. If the puff pastry doesn't work out, I would try phyllo or a pate brisee. Also, pears would be a perfect substitute.
MXF
Pancetta, White Bean and Chard Pot Pies
Smitten Kitchen
Serves 4
LID:
2 cups (250 grams) all- purpose flour
1/2 teaspoon table salt
13 tablespoons (185 grams or 1 stick plus 5 tablespoons) cold unsalted butter, diced
6 tablespoons (90 grams) sour cream or whole Greek yogurt (i.e., a strained
yogurt)
1 tablespoon (15 ml) white wine vinegar
1/4 cup (60 ml) ice water
1 egg, beaten with 1 tablespoon water, for egg wash
FILLING:
2 tablespoons (30 ml) olive oil
4 ounces (115 grams or 3/4 to 1 cup) 1/4-inch-diced pancetta
1 large or 2 small onions, finely chopped
1 large carrot, finely chopped
1 large stalk celery, finely chopped
Pinch of red pepper flakes
Salt and freshly ground black pepper
2 garlic cloves, minced
Thinly sliced Swiss chard leaves from an 8- to 10-ounce (225- to 285-gram)
bundle (4 cups); if leaves are very wide, you can halve them lengthwise
3 1/2 tablespoons (50 grams) butter
3 1/2 tablespoons (25 grams) all- purpose flour
3 1/2 cups (765 ml) sodium- free or low- sodium chicken or vegetable broth
2 cups white beans, cooked and drained, or from one and a third 15.5- ounce
(440-gram) cans
Weekday night tip: Make a double batch of the stew and lids. Keep them separate and for two to three nights, you can ladle what you’d like into bowls, roll out lids and bake them to order.
Make lids:
In a large, wide bowl (preferably one that you can get your hands into), combine the fl our and salt. Add the butter and, using a pastry blender or your fingertips, cut them up and into the flour mixture until it resembles little pebbles. Keep breaking up the bits of butter until the texture is like uncooked couscous. In a small dish, whisk together the sour cream, vinegar, and water, and combine it with the butter-flour mixture. Using a flexible spatula, stir the wet and the dry together until a craggy dough forms. If needed, get your hands into the bowl to knead it a few times into one big ball. Pat it into a flattish ball, wrap it in plastic wrap, and chill it in the fridge for 1 hour or up to 2 days.
Make filling:
Heat 1 tablespoon olive oil over medium- high heat in a large, wide saucepan, and then add the pancetta. Brown the pancetta, turning it frequently, so that it colors and crisps on all sides; this takes about 10 minutes. Remove it with a slotted spoon, and drain it on paper towels before transferring to a medium bowl. Leave the heat on and the renderings in the pan. Add an additional tablespoon of olive oil if needed and heat it until it is shimmering. Add onions, carrot, celery, red pepper flakes, and a few pinches of salt, and cook over medium heat until the vegetables are softened and begin to take on color, about 7 to 8 minutes. Add the garlic, and cook for 1 minute more. Add the greens and cook until wilted, about 2 to 3 minutes. Season with the additional salt and freshly ground black pepper to taste. Transfer all of the cooked vegetables to the bowl with the pancetta, and set aside.
Make sauce:
Wipe out the large saucepan; don’t worry if any bits remain stuck to the bottom. Then melt the butter in the saucepan over medium- low heat. Add the flour, and stir with a whisk until combined. Continue cooking for 2 minutes, stirring the whole time, until it begins to take on a little color. Whisk in the broth, one ladleful at a time, mixing completely between additions. Once you’ve added one- third of the broth, you can begin to add the rest more quickly, two to three ladlefuls at a time; at this point you can scrape up any bits that were stuck to the bottom — they’ll add great flavor.
Once all of the broth is added, stirring the whole time, bring the mixture to a boil and reduce it to a simmer. Cook the sauce until it is thickened and gravylike, about 10 minutes. Season with salt and pepper. Stir the white beans and reserved vegetables into the sauce.
Preheat your oven to 375 degrees.
Assemble and cook pot pies:
Divide the filling between four ovenproof 2-cup bowls. (You’ll have about 1 1/2 cups filling in each.) Set the bowls on a baking pan. Divide the dough into four pieces, and roll it out into rounds that will cover your bowls with an overhang, or about 1 inch wider in diameter than your bowls. Whisk the egg wash and brush it lightly around the top rim of your bowls (to keep the lid glued on; nobody likes losing their lid!) and drape the pastry over each, pressing gently to adhere it. Brush the lids with egg wash, then cut decorative vents (smaller than mine, please, as they led to lots of draping) in each to help steam escape. Bake until crust is lightly bronzed and filling is bubbling, about 30 to 35 minutes.
Do ahead:
The dough, wrapped twice in plastic wrap and slipped into a freezer bag, will keep for up to 2 days in the fridge, and for a couple months in the freezer. The filling can be made up to a day in advance and stored in a covered container in the fridge.
Coquilles Sant Jacques
Laura Calder / French Food Made Easy
Yield: 6 servings
SCALLOPS:
1 tablespoon butter
1 tablespoon olive oil
1 pound/450 g scallops
Salt and freshly ground black pepper
DUXELLES:
2 tablespoons butter
8 ounces/250 g mushrooms
2 shallots, minced
Salt and freshly ground black pepper
1 tablespoon chopped fresh parsley
SAUCE:
2 tablespoons butter
1 shallot, minced
2 tablespoons flour
1/2 cup125 ml white wine
1/2 cup/125 ml fish stock
2 tablespoons creme fraiche
Lemon juice, to taste
TOPPING:
2 tablespoons chopped fresh parsley
6 tablespoons fresh bread crumbs
1 tablespoon butter, melted
Total Time: 45 min / Prep: 15 min / Cook: 30 min
Prepare the scallops: Heat the butter and oil in a large saute pan. Season the scallops with salt and pepper and sear 1 minute per side, to brown. Do not cook completely. Set aside.
To make the duxelles: Melt the butter in a large saute pan until foaming. Add the shallot and saute until soft. Add the mushrooms, and season with salt and pepper. Cook until the mushrooms have released all their liquid and the pan is dry, about 10 minutes. Transfer the mushrooms to a bowl and stir through the parsley.
To make the sauce: Melt the butter in the saute pan until foaming. Add the shallot and cook until soft. Stir in the flour and cook, stirring, 3 minutes. Whisk in the wine and boil down by half. Add the stock and cook, stirring, until the sauce is thick enough to coat the back of a spoon. Remove from the heat and stir in the creme fraiche. Check the seasonings, adding salt, pepper, and lemon juice, if needed.
To assemble the dish: Heat the oven to broil with the oven rack at the top. Lay 6 large scallop shells or individual gratin dishes on a baking sheet. Divide the mushroom mixture among the shells. Arrange six scallops on each, then spoon over the sauce. For the topping, scatter over the parsley and breadcrumbs, drizzle over the melted butter, and broil until golden and bubbly, 2 to 3 minutes. Serve immediately.
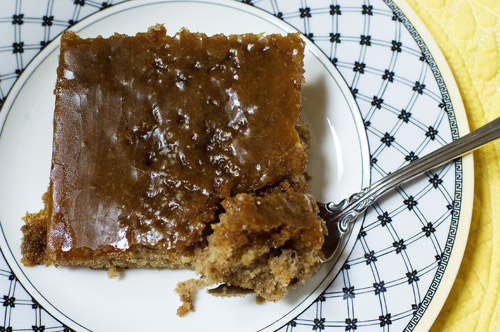
Grandma Iny's Prune Cake
Pioneer Woman
Serves 12
FOR THE CAKE:
1 cup Prunes
1 cup Sugar
3 whole Eggs
1 cup Canola Oil
1-½ cup Flour, Sifted
1 teaspoon Baking Soda
1 teaspoon Nutmeg
1 teaspoon Allspice
1 teaspoon Cinnamon
1 cup Buttermilk
1 teaspoon Vanilla Extract
FOR THE ICING:
1 cup Sugar
½ cups Buttermilk
½ teaspoons Baking Soda
1 Tablespoon White Corn Syrup
¼ cups Butter
½ teaspoons Vanilla
Prep Time 25 Minutes / Cook Time 40 Minutes
Preheat oven to 300 degrees.
Cover prunes with water. Bring to a boil and cook until soft and mashable, about eight minutes. Remove from heat, drain water, and mash on a plate. Set aside.
Mix together oil, sugar, and eggs. In a separate bowl, sift together dry ingredients. Combine wet and dry ingredients, add buttermilk and vanilla and stir gently until just combined. Throw in the mashed prunes and stir gently to combine. DO NOT OVERMIX!
Pour batter into buttered baking dish (9 x 13 or so) and bake for 35 to 40 minutes. DO NOT OVERBAKE OR INY WILL PADDLE YOUR BOTTOM.
While cake has five minutes remaining, make the icing:
Combine all icing ingredients in a medium saucepan over medium heat and bring to a slow boil. Boil without stirring for 5 to 7 minutes, or until icing starts to turn dark. Do NOT allow icing to reach soft ball stage; icing should be caramel in color, but not sticky like caramel. Icing should be easily pourable.
Remove cake from oven and pour on icing immediately.
Allow to rest on the counter. Serve warm.
NOTE: There is absolutely zero “prune effect” associated with this cake. The end.
Subscribe to:
Posts (Atom)